Archive for the ‘Commanders’ Category
Operation Fortitude: The Art of Deception
The famous Chinese military strategist, Sun Tzu is credited with saying that “All war is deception,” meaning that a skillful general will deceive his opponent so that he can increase his odds of success. During World War II, Operation Fortitude in support of the Allied invasion of France was one of the best examples of the use of deception to support military operations at any time in history. The intent of the Fortitude Plan was to convince the Germans that the Allies would most likely strike at the Pas de Calais on the expected cross-Channel attack so that the German army would concentrate a significant portion of their forces away from the Normandy area. At the same time, another part of the Fortitude plan threatened a strike in Norway with the intent to also cause them to have to defend that area as well. When the landings occurred in Normandy on June 6th the German High Command considered this to be a diversion. They held a significant portion of their best armored units in reserve believing that the real attack would come later; but in fact, Normandy was the main assault. As the Supreme Commander, General Eisenhower understood exactly what Sun Tzu had in mind.
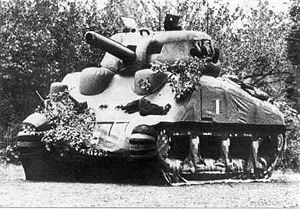
The deception was partly predicated on the German belief that the Pas de Calais was the most likely place to mount a cross-Channel attack because it was the shortest route from England. This would shorten the Allied logistical lines which would maximize air support from aircraft based in southern England, as well as maximize the sealift capability by minimizing the time required for a ship to deliver its cargo and return for another trip. Allied intelligence realized this German pre-disposition, so the Fortitude plan was created to support their thinking. A fictitious army complete with dummy tanks, trucks, and tents was set up in southern England under the command of American General George S. Patton. Patton was considered perhaps the best Allied field commander, and so this added to the deception; however, Patton was in actuality being temporally “benched” by Eisenhower for his misconduct in Sicily where he slapped some soldiers in field hospitals who were suffering from “battle fatigue.” While Patton’s stated intentions were to shame the soldiers into returning to their units and rejoin the fight, the press reported the incident which outraged politicians on the home front. So to defuse the situation while still keeping Patton available for future operations, Eisenhower assigned him to command the phantom First US Army Group. German agents soon reported his presence which helped to support the deception story.
Additionally, the Allies conducted routine, but false, radio traffic which they knew would be intercepted by German intelligence. This also created the impression that the First US Army Group was active. They also periodically moved some of the mocked up tanks and trucks, and created tracks in the fields to make it look as if they were moved so that if the Germans flew aerial reconnaissance, they would believe that there was in fact a real army on the ground. However, because the German Luftwaffe was under constant attack by the Allied air forces, they likely did not overfly the area. Nevertheless, the British intelligence had also turned some of the German agents into double agents, so their stories of Allied army activities which they reported back to their German handlers seemed all the more real and part of a coherent story.
The Fortitude pan was successful in achieving is intended result s. The old military maxim held true: he who defends everywhere, defends nowhere. Although the landings in Normandy were strongly contested by the German defenders from fortified positions, the Allies succeeded in part because the bulk of the German armored units were not committed to a strong counter attack sooner. By the time the Germans realized that this was the main assault, the Allies had already obtained a strong foothold on the Continent, and it was too late to dislodge them. Sun Tzu could have predicted the result.
December 1944 -Winter in the Bulge
Near the end of the Normandy Campaign on August 15, 1944, the Allies launched another assault through southern France, code named Operation Dragoon. Originally this was planned to be a concurrent operation with the Normandy landings so as to be mutually supporting; however, due to a shortage of available shipping, General Eisenhower reluctantly postponed Operation Dragoon until August. Although Dragoon was slightly smaller in size and scope than Operation Overlord in Normandy, the Allies still landed a formidable force of almost 100,000 soldiers and over 10,000 vehicles on the first day alone. After overcoming initial resistance, the Allies continued to bring in more men and supplies, and opened the major port of Marseilles. These port facilities were needed not only to support the additional troops for Dragoon, but to supply the entire Allied force on the Western Front. Both of the Allied armies from Overlord and Dragoon eventually linked up in mid-September near Dijion, France, as they continued to press their retreating German adversaries across the entire length of Western Europe.
Also in September, General Eisenhower authorized British General Montgomery to conduct Operation Market Garden which was intended to be a lighting strike through Holland and into Germany across the Rhine River. His plan was to use three airborne divisions to seize critical bridges in Holland which would be used by an armored force thrusting from the Belgium border across Holland and into Germany by crossing the Lower Rhine River at Arnhem. The two pronged Market-Garden plan was given priority for supplies and logistics among other Allied operations. This infuriated other American commanders, particularly General Bradley and General Patton who had to restrain his Third Army and conduct only limited attacks further south in France while Market-Garden was in progress.
The Market-Garden battle did not unfold as Montgomery had planned: Most of the bridges were seized after heroic action by the paratroopers, except for the last one at Arnhem over the Rhine as the armored columns were delayed along the way. Consequently, the Allies got mired in Holland instead of making it into Germany. The British paratroopers could not hold onto the Arnhem bridge until relieved and sustained many casualties until they were ordered to withdraw those who could still make it back to rejoin the Allied line. From then on the phrase “a bridge too far” was born to explain what happened, and this phrase is now commonly used to describe stretch goals which are unlikely to be achieved in whatever the endeavor.
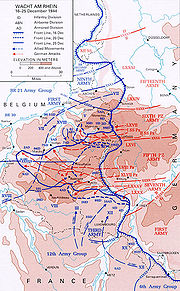
Yet despite the disappointment in Operation Market-Garden, the German army had been taking horrendous losses on both the Western and Eastern Fronts as well as in Italy. Thus, many observers and soldiers alike were envisioning a quick Allied victory and some even predicted that hostilities would end by December, but this also was not to be so. Hitler had been planning his own major thrust through the Ardennes Forest to knock the momentum out of the Allied advance and split their force in two by launching a blitzkrieg strike from lower Belgium into the Allied line towards the North Sea port of Antwerp on the coast. He hoped that if he could succeed, he might be able to get the Western Allies to agree to a separate peace accord so that he could focus his attention on the Red Army in the east. So, in October and November, the Germans began massing their panzer forces for a December attack through the Ardennes where the Allies had considered it to be unlikely that the Germans would be able to conduct offensive operations. The Germans were counting on the element of surprise in addition to a swift advance, and if everything went their way, the winter weather conditions would limit the Allies from using their vastly superior air forces.
Initially the Germans got lucky, and their attack, which began with a massive artillery barrage on December 16th, was soon followed up with a blitz by their panzer units. They pushed through the American lines where Eisenhower has posted a mixed group of new units, and combat hardened units that were recuperating on what was considered the “quiet front.” The resulting German advance created “bulge” in the Allied line and hence the largest battle on the Western Front ,and the largest for American forces in any theater of WWII, would be known thereafter as the “Battle of the Bulge.” While the combat experienced units put up a valiant defense in the face of overwhelming German forces, the inexperienced units mostly fell back in disarray and many soldiers were taken as POWs in front of the advancing Germans.
Eisenhower quickly moved into the breach some of his experienced units that were being held in reserve including the paratroopers from the American 82nd and 101st Airborne divisions, but they were not equipped for winter warfare and were short on ammunition and supplies. The 101st was sent to the town of Bastogne where there was a junction of the main roads that ran through the area. If this town could be held, then it would likely stall the German advance and buy time for additional Allied forces to be brought into the fight.
While the paratroopers who were supported by some available armor units from the American 10th Armored Division dug in around Bastogne, Eisenhower called a conference with his major commanders to deal with the situation. As the Germans had hoped, the weather kept the Allied aircraft on the ground, and they were able to maneuver more freely such that they surrounded the pocket around Bastogne by December 21st. At the Allied commander’s conference, General Patton announced that he could redirect elements of his Third Army that were positioned to the south of the pocket to begin an attack north within 48 hours much to the surprise of the other senior commanders. The Allied commanders then set forth to counter-attack the Germans from the south with Patton’s Third Army and also from north with a combined American and British effort forming a pincer to cut off the German advance and relieve Bastogne. They planned to turn the unexpected crisis into an opportunity to defeat the Germans who were now mired in the bulge without supplies and reinforcements of their own.
As promised, Patton began his advance north towards Bastogne, but the northern force did not begin simultaneously because General Montgomery, who was generally a more cautious commander, wanted more time to prepare his units. This was also controversial since Eisenhower had placed the American First and Ninth Armies, a part of Bradley’s command, under Montgomery because the bulge had cut them off from Bradley’s HQ. It was primarily the Americans who would also attack from the north, and not the British. Meanwhile the Germans had sent an ultimatum message requesting the US commander in Bastogne to surrender his forces or be destroyed. Despite the dreadful conditions and shortages of ammunition and food, General Anthony McAuliffe, acting commander of the 101st Airborne answered with a one word reply – “nuts!” As the weather conditions improved on December 23rd the Allied air forces were able to attack the German panzer formations and provide limited supplies by air to the embattled forces in Bastogne. The improved weather conditions also allowed the Third Army to continued their attack, and they eventually reached Bastogne by December 26th bringing additional supplies and evacuating the wounded.
A frustrated Eisenhower urged Montgomery to finally commence his attack from the north on January 1st 1945, however, Montgomery did not get going until January 3rd due to another snowstorm. Nevertheless, the British and American forces in the north had played an important part in the battle by thwarting the German advance towards their primary objective, Antwerp, and now that they began their counter-attack, the Germans were forced to pull back to their original lines – but leaving most of their armor and heavy equipment behind. Just as had happened in Normandy, the Allies had failed to fully shut the back door on the retreating German army, but they had substantially depleted their ability to conduct any more offensive operations having suffered estimated 80 – 100,000 casualties and losses of critical equipment. Although the Americans had also suffered a similar loss, it was the Germans who were now totally defensive whereas the Americans could continue to replace losses in men and equipment. Following the battle, Winston Churchill said of the Americans: “This is undoubtedly the greatest American battle of the war and will, I believe, be regarded as an ever-famous American victory”.
Pegasus Bridge –Part Two – Mission Success
At seven minutes after midnight on June 6th 1944, the gliders cut loose from their Halifax bomber tow-planes and began their silent descent into Normandy. The first three gliders made controlled crash landings at sixtteen minutes after midnight in the narrow strip of land between the two bridges and came to rest within meters of the bridge over the Caen Canal. They had achieved complete surprise, but with the hard landings, the occupants of the gliders were temporarily stunned. They quickly recovered, and as they had practiced on numerous occasions, they regrouped and jumped into action to overwhelm the few sentries on the bridge. Major Howard established his command post and pushed his men forward into the nearby villages of Benouville and Le Port to set up road blocks on key junctions to defend against an expected counter-attack. Within less than 20 minutes they had achieved one of their primary objectives in seizing the Canal Bridge, but at a high cost: all three platoon leaders and several of the non-commissioned officers were casualties. Now it was up to junior leaders to complete the rest of the mission – “hold until relieved.”
On the other side of the narrow strip between the canal and the Orne River, two of the gliders landed near their bridge, but the other mistakenly landed over two kilometers away. Despite the loss of one third of their strength, the remaining two platoons succeeded in seizing the river bridge. With the bridges secure, the engineers were disarming the explosives that were set by the Germans, Dr. Vaughn was setting up his aide station, an d Major Howard’s radio operator was sending the success signal: “Ham and Jam” onto higher headquarters. Then, just before 0100 hours, the paratroops of the British 6th Airborne began to drop from the sky. One of their battalions had the mission to join Major Howard’s D Company at the bridges. Like all the paratroopers that night, they were scattered and mis-dropped away from their intended drop zones. Nevertheless, the battalion commander, decided to proceed to the bridges even though he had only gathered about one third of his force. Isolated groups of paratroopers would infiltrate into the British lines throughout the night.
Meanwhile the Germans were preparing to counter-attack as they were trained to do. Their experienced commanders knew that it was best to launch an immediate attack before the British could set up a defense. One of the regimental commanders from the 21st Panzer Division, Colonel Von Luck, put his men on alert in the vicinity of Caen, but could not proceed without orders. The German high command had maintained tight control on all their armored formations and most even required approval from Hitler himself before they could be employed. Approval would be slow to come; however, small advance panzer elements were near the vicinity of the canal bridge, and they started a probing attack. Although they were not exactly sure of the situation a few tanks and infantry in self-propelled vehicles slowly clanked toward the bridges. As they proceeded, one of the British sergeants positioned himself with a PAIT gun, a crude anti-tank weapon. Sergeant Thorton courageously waited until he had a good shot and was able to knock the lead tank out of action. Fearing that the British had additional anti-tank capabilities, the Germans decided to hold off until they could get a better picture of the situation in daylight; nevertheless, they kept up infantry probes and their snipers engaged targets in and around the bridge. Realizing the importance of the bridges, the Germans mounted other attacks throughout the night including using a river gunboat and frogmen. Again using only the light weapons they had brought with them and some of the German weapons that they had captured, the British held off these advances throughout the night and into the morning.
At around 0730, the British 3rd Infantry Division accompanied by Commandos began landing on Sword Beach. As they proceed inland, they met more determined resistance at prepared strong-points. The 21st Panzer had finally been ordered into the battle and was proceeding in the direction of the beach. Further counterattacks on the bridgehead took their toll, but the glider men and the paratroops held on. Then at about 1300 hours, they heard the sound of bagpipes. It was bagpiper, Bill Millin, leading the way for Lord Lovat’s British Commandos who were bringing with them British armor and heavy weapons. With their arrival, Major Howard could now say that he had fully accomplished his mission; however the price in causalities was heavy. History now remembers this action as the Battle of Pegasus Bridge and the bridge was so named in honor of the Pegasus insignia of the British Airborne.
Here is a link to a Google map of the bridge today: Google Map Pegasus
Pegasus Bridge – Part One – Getting Ready for a High Priority Mission
Within minutes after midnight on June 6th 1944, the first Allied unit landed in Normandy in six British Horsa gliders. Their mission was given the highest priority by General Montgomery, the land component commander and commander of the British 21st Army Group – to assault and seize two bridges, one over the Caen Canal and the other over the Orne River and hold until relieved. Montgomery knew that he had to seize these critical bridges to prevent the Germans from mounting an armored counter-attack. The bulk of the German Panzer units were positioned farther east in the vicinity of Calais, and if they were able to launch such an attack, the Germans would cause havoc with the British 3rd Infantry landing on Sword Beach. A powerful armored thrust could also roll up each of the five Allied beaches one after the other and disrupt all the Allied landings before they could secure a lodgment and bring in reinforcements. Additionally, the British 6th Airborne Division was landing to the east of these bridges and it would be over these bridges that British armored forces would be brought forward from Sword Beach to reinforce the paratroopers and prevent them from being isloated. The high priority mission to capture these bridges in a coup-de-main assault was given to Major John Howard.
Major Howard was a remarkable leader who came up through the ranks. Before the war, he enlisted in the British Army and served for six years attaining the rank of sergeant before he left the service to become a police officer in Oxford. After the war began, he was recalled back to military service. His leadership skill was quickly recognized by his superiors and not only was he promoted to sergeant major, but also selected to receive a commission as an officer. By 1942 he was promoted to the rank of major and commanded D Company, Oxfordshire and Buckinghamshire Light Infantry as a part of the elite 6th Airborne Division. Howard was masterful trainer, and relentlessly drove his unit to a high standard of readiness through incessant training exercises. When the Overlord Plan for the invasion was conceived and the requirement arose to seize these key bridges, Howard’s unit was selected because the division commander recognized it as one of his best units. Shortly after the mission was given to Howard, his commander told him that he would be given whatever resources he needed including an additional two platoons of infantry, a platoon of engineers, and even a medical doctor who would accompany the assault. Howard not only continued his tough training regimen, but once he knew his mission and had access to current intelligence about the target, conducted multiple practice runs with a variety of scenarios on mock-ups of the targets.
Eventually, his unit was prepared for almost any imaginable contingency that could arise during this difficult night assault. Howard’s plans called for landing his unit in six gilders within close proximity of the bridges and catch the German defenders off guard. Using surprise and shock action, he planned to quickly overcome any resistance and then set up to defend against a counter-attack. While the assault troops seized the bridges, the engineers would disarm any demolitions that the Germans had set to destroy them rather than have them fall into enemy hands. Since the night landing by gliders was extremely hazardous, Howard prepared his men by making sure that everyone was ready to step up if one or more of the gliders missed the target, or if key people were killed or wounded during the assault phase. As his men went into action it was the intense training that had prepared them for this difficult assignment and gave them high confidence that they could accomplish the mission no matter what happened. They were the first Allied unit to land on French soil and they were ready.
The “Other Guys”
During World War II in Europe, there were multiple personalities who disproportionately received much of the publicity and attention from the press. Students of history will remember the names of Churchill, Roosevelt, and Stalin because of their high profile positions as heads of state for the major Allied Powers. They would have likely garnered much attention simply due to their positions. Likewise General DeGaulle is remembered as the leader of the Free French, not necessarily for his military prowess, but primarily for his political skills. Most will also recall the names of Eisenhower, Montgomery, Patton, Bradley, and even the German Field Marshal Rommel as the dominate personalities of their respective military commands; however these military leaders, perhaps have received a disproportionate amount of recognition when compared to less well known military commanders. Clearly they made huge contributions, however so did some of the “Other Guys.” On the Allied side, Gen Crear (Canadian), Gen Dempsey (British), Gen Hodges (US), Gen Simpson ( US), Gen Patch (US) and Gen Tassigny (FR) also skillfully led significant army commands in Western Europe and their troops made decisive contributions to the outcome of the war. Likewise on the German side, Field Marshals Von Rundstedt, von Kluge, and Model were key players along with other even lesser known generals in leading their army as it fought the advancing Allies in Western Europe.
So who are these lesser known leaders, and what role did they play in the war? This is the first post in a series that will explore the backgrounds and contributions of these lesser known figures, but who nevertheless played significant roles. Students of both history and leadership will appreciate that it was not just the more well know leaders who were always the most important in determining the outcome in every battle. In war as in peace, sometimes leaders who don’t have the public profile can influence events as much or more than those who receive a disproportionate amount of publicity. Check back here periodically in the future to learn more about these lesser known leaders. The contributions and leadership styles of the “Other Guys” may surprise you.
Here is a intriguing picture of some of them who happened to be Americans:
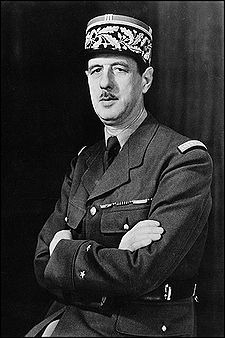
Charles de Gaulle – Leader of the Free French Forces
Charles de Gaulle was the self-anointed leader of the Free French Forces and landed on Juno Beach on June 13, 1944 to assert his authority as leader of the Provisional Government of France following the D-Day invasion.
General de Gaulle was born in 1890 into an aristocratic family that had roots in French Flanders. As a young man, he developed an interest in history and went to college in Paris before deciding on a military career and attending the French military academy, St. Cyr. He graduated from the four year course at St. Cyr and was commissioned as an infantry officer in 1912. During the first World War, he was wounded at the Battle of Verdun in 1916 and taken prisoner by the German Army. After the war, he served in Poland as an instructor to the Polish Army during thier conflict with the Russian army in the early 1920’s. Following his service in Poland, her returned to France and was a staff officer and an instructor at the Ecole Militaire. During this period he became student of armored warfare similar to some of his contemporaries in the German, British and American armies who also were developing theories about maneuver warfare. During these interwar years, he began publishing articles about his theroies and views, which were often criticized by other French officers and senior leaders.
At the beginning of WWII, he was a Colonel in command of a tank brigade, but when the German blitzkrieg attack began, he was quickly promoted to command the French 4th Armored Division and the rank of Brigadier General. Although he lacked air support, he immediately attacked the German army as it was invading France in 1940 and had some limited successes, but could not defeat the superior German force. Eventually, he became the French liason officer to the British, where he sought their help following the surrender of France by Marshal Petain. After fleeing to the safety of England, de Gaulle set about organizing the Free French Forces to oppose the German occupation and fight with the Allies. Despite the support he received from both the British and later the Americans, de Gaulle proved to be a difficult partner for the Allies. He was always suspicious of the Allies’s intentions and they were likewise unsure of de Gaulle. Consequently, they did not include him in their plans for Operation Overlord until the eve of the invasion. Shortly after D-Day, he landed on French soil and quickly moved to take command of all Free French Forces. When Paris was finally liberated, de Gaulle staged a grand entrance and made a famous speech to the French people where upon he was made President of the Provisional Government of the French Republic. He then went about fielding the French First Army which joined the Allies for the invasion of southern France and the eventually defeat the German army. De Gaulle resigned his position after the war, but was later elected President of France with the founding of the 5th Republic in 1958. He held this post until 1969. His tenure is remembered for his strong assertion of French independence and nationalism during the height of the Cold War era of the global struggle between the Western nations and the Soviets. De Gaulle died in 1970 at the age of 80.
As a leader, de Gaulle exemplified the Victory Principles. He certainly had a vision of a free, independent French nation which he championed ardently throughout the period of WWII and thereafter. His values of putting French national interests first often caused him to be a difficult partner to work with from the viewpoint of his allies, but he tenaciously pursued what he thought were the best interests for the French Republic. He demonstrated resilience by overcoming many difficulties in organizing Free French Forces during the war, and asserting his political will over both his political adversaries in France and within the Allied governments to become the leader of the Provisional Government of France. Finally, he always put the interests of his country and team first which was best illustrated by his refusal to accept a pension for his service as president and general, and instead chose to be paid a pension for a colonel, the rank from which he rose at the beginning of the war. Without a doubt he was a controversial leader, but no one can ever say that he put his personal interests ahead of those of his nation or the people. He was a strong leader for France when France needed him.
For more information follow this link: http://en.wikipedia.org/wiki/Charles_DeGaulle
The Supreme Commander: General Dwight D. Eisehhower
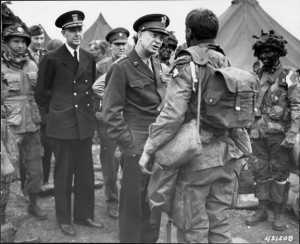
Gen. Eisenhower visits 101st Airborne just before D-Day on June 5th 1944 at their airfield in England
In December 1943, President Roosevelt announced that General Dwight D. Eisenhower would be designated as the Supreme Allied Commander to lead the combined Allied forces for the invasion of Europe on D-Day, June 6th 1944. Eisenhower graduated from the US Military Academy at West Point with the Class of 1915. He began his military career in the infantry and served stateside during World War I, much to his chagrin. He later was assigned to served in the new tank corps and after the war was over, developed a close friendship with a fellow tank corps officer, George S. Patton. Like many officers in the post World War I army, his career progression stagnated; however he made some close associations with mentors like General Fox Conner and later General Douglas MacArthur whom he accompanied to the Phillipines when MacArthur retired from the US Army to train the Philippine Army. Eisenhower also distinguished himself by graduating first in his class at the army Command and General Staff College at Ft. Leavenworth, Kansas.
When World War II began in Europe, Eisenhower was reassigned back to the US and after a series of assignments was brought to Washington DC to serve under the Army Chief of Staff, General George C. Marshall, as the head of the War Plans Divsion. He was quickly promoted to Brigadier General in this assignment, and although he was a relatively junior general officer, he demonstrated his ability not only for planning, but more importantly for dealing with people who had strong personalities and were often senior in rank. These were leadership qualities that were noticed by General Marshall and at his urging to President Roosevelt and Prime Minister Churchill, General Eisenhower was selected to command the first combined British and American operation for the invasion of North Africa. As the Commander for Operation Torch and the subsequent Operation Husky to invade Sicily, Eisenhower demonstrated his remarkable skill for fostering teamwork among the Allied commanders. This skill for handling the strong personalities of the different commanders and forging them into a cohesive team was the primary factor for his selection as the Supreme Commander for the invasion of France in 1944. No other general, either American or British, with the possible exception of Marshall himself, could effectively lead the coalition. Although Eisenhower’s patience was tested on many occasions, it was his ablitly to build and maintain an effective team that was more important to his success than technical war-fighting skills. He deserves much credit for the final victory in Europe for this leadership ability to forge an effective team which is immeasurably more difficult when your command is a combined Allied force. Although other generals often were getting headlines for the exploits of their units, it was Eisenhower at the helm that made the combined Allied effort effective.
You can read more about Eisenhower’s career both during and after the war at the following link: http://en.wikipedia.org/wiki/General_Eisenhower
